What is SEO?
Search engine optimization is the process of optimizing a site (in our case, a web app) to improve its visibility in search engines.
There are a lot of sites out there, and users need relevant information fast. That’s exactly what search crawlers are for — they index sites based on a number of specific metrics, which we’ll go over below.
The whole search indexing process can essentially be split into 3 stages:
- Crawling: gathering data by following links across the site’s pages and analyzing them.
- Indexing: the data gets processed and added to the search engine’s index — without getting into the weeds of a whole course on the subject, let’s just say it’s a big, search-optimized database.
- Ranking: the page gets scored based on specific metrics. Later, on a user query, the system picks the most relevant sites and returns them.
So why bother with SEO at all?
It matters both for business (to stay ahead of competitors) and for user experience (so the first page of results actually has what people are looking for).
What metrics determine a resource’s relevance?
Technical metrics
This category includes:
- Load speed.
- Responsiveness: for example, Google’s engine uses a mobile-first approach, meaning the mobile version takes priority.
- Crawlability:
robots.txt,sitemap.xml, canonical links, and so on. - URL structure and readability.
Content metrics
Here, the site’s actual content matters. These metrics include:
- Keywords and semantics: for example, if a user searches for “buy iPhone 15,” crawlers check whether those words appear in
<title>,<h1>,<meta name="description">, and the main body text. - Content uniqueness.
- Accessibility for users:
altattributes on images,ariaattributes, and so on should be used.
For the more advanced, there’s structured data markup. We won’t go into it here, but here’s an example for that same iPhone 15 query.
<script type="application/ld+json">
{
  "@context": "https://schema.org/",
  "@type": "Product",
  "name": "iPhone 15",
  "description": "The new iPhone 15 with an improved camera.",
  "brand": {
    "@type": "Brand",
    "name": "Apple"
  }
}
</script>
Behavioral metrics
These metrics have to do with how users actually interact with the site.
- Time on site: the longer users stay, the higher its relevance.
- Bounce rate.
- Pages per visit: users should be browsing several pages in one visit.
- CTR (Click-Through Rate): a high CTR in search results signals that the page’s title and description are relevant to the query.
External metrics
These metrics are about the site’s authority and popularity on the web.
- Backlinks: the more high-quality backlinks (from authoritative sites), the higher the relevance. If Forbes or Wikipedia links to your site, for instance, that boosts trust.
- Domain trust: the more trusted the domain, the higher the relevance. For example, if you host your site on GitHub Pages, it’ll rank among the first results for your query.
What is an SPA?
A single page application is a modern approach to building web apps. It’s become increasingly common lately thanks to its relative simplicity and speed of development and maintenance.
The idea is this: the app loads a single, essentially empty HTML page (with no meaningful content), and its contents are then updated dynamically as the user interacts with it.
For the rest of this piece we’ll use React and think through how to get React apps to actually rank in search.
An Ounce of Prevention
Of course, it would be ideal if your app’s architecture already allowed for the optimizations we’ll talk about below. Ideally, you’d think this through before setting sail — and for simplicity, that’s exactly the kind of case we’ll be looking at. That said, there are plenty of more flexible, simpler (if less capable) solutions for bolting this onto an already-written project.
Server-Side Rendering (SSR)
Theory
So, our main problem is that there’s no content on the page at load time! Many search crawlers still execute JS very poorly, which means your page gets indexed in whatever state you “fed” it to the crawler:
<!DOCTYPE html>
<html>
  <head>
    <!-- Some styles -->
  </head>
  <body>
    <div id="root"></div>
    <script src="index.js"></script>
  </body>
</html>
And there’s no way to tell whether your page is even relevant to the user.
| A quick detour on meta tags. You might reasonably ask: sure, the fundamental problem is undeniable, but what about just adding meta tags? We do have a <head>, so why not just edit app.html? That does make sense, and it’ll even work — but only if you genuinely have exactly one page. Meta tags need to be accurate for every single page. We’ll get to the technologies that let you add meta tags to each page dynamically further down.
So, back to the empty-page problem. Our setup currently looks like this:

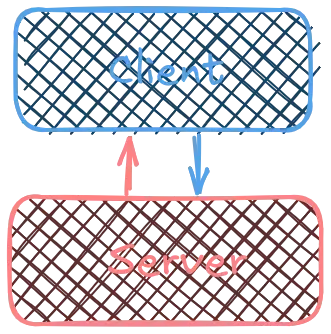
How do we make sure we get content right away, without waiting for the page to fully load? Using a template engine would be a great solution, but we’re working with an SPA. And that’s exactly what SSR is for.
Let’s put a middleman server between the backend and the client. Whenever we need something from the server, we’ll go through this middleman — a metaframework — which talks to the server the right way. Schematically, it looks like this:
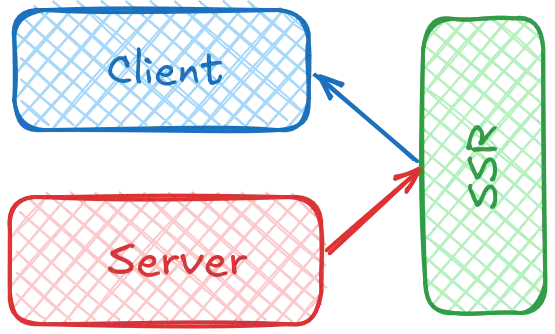
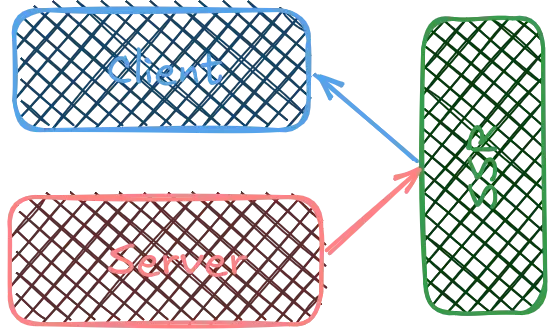
This way, search crawlers get an already-prerendered page and can process it correctly.
How do you implement it in React?
The most popular and convenient choice for most requirements is Next.js. It’s about as stable and sensible a solution as you’ll find, and plenty of big projects trust it.
It provides two kinds of components: 'use server' for server components and 'use client' for client components. Server components have access to a special getServerSideProps(context) function, where we can talk to an API and return some data from the backend.
This approach, in particular, makes it easy to work with cookies or manage caching.
Since this is a survey-level talk, we obviously won’t dive too deep into the code (and honestly, no one could explain how SSR works in Next.js better than the official docs anyway) — here are just a few examples.
Example 1: simple data passing via props
export async function getServerSideProps(context) {
  const res = await fetch('https://abaunda.org/post/69');
  const data = await res.json();

  return {
    props: {
      data,
    },
  };
}

export default function Page({ data }) {
  return (
    <div>
      <h1>Data from the server:</h1>
      <pre>{JSON.stringify(data, null, 2)}</pre>
    </div>
  );
}
Example 2: reading request headers
export async function getServerSideProps(context) {
  const userAgent = context.req.headers['user-agent'];
  return {
    props: {
      userAgent,
    },
  };
}
Example 3: setting response headers
export async function getServerSideProps(context) {
  context.res.setHeader('Cache-Control', 'public, s-maxage=10, stale-while-revalidate=59');
  const res = await fetch('https://abaunda.org/post/69');
  const data = await res.json();

  return {
    props: {
      data,
    },
  };
}
Static Site Generation (SSG)
Theory
SSR is a very powerful solution for apps that are dynamic and talk to the server a lot. But if a page’s content doesn’t change all that often (blogs or landing pages, say), SSR can turn into unnecessary over-engineering.
Really, why would we request a render of a complex app every single time if the output is going to be the same? It’s much more sensible to just build the project into static HTML pages upfront, and have the server serve those.
That approach exists, and it’s called Static Site Generation. Its main advantage over SSR is extremely fast performance.
That said, if you need something more dynamic, SSG isn’t the right fit — go with SSR instead.
How do you implement it in React
Next.js also supports SSG. Similarly to SSR, there’s a function for fetching static props, getStaticProps(). It runs at build time.
A simple usage example:
export async function getStaticProps() {
  const res = await fetch('https://abaunda.org/posts');
  const posts = await res.json();

  return {
    props: {
      posts,
    },
  };
}

export default function Blog({ posts }) {
  return (
    <div>
      <h1>Blog</h1>
      <ul>
        {posts.map((post) => (
          <li key={post.id}>{post.title}</li>
        ))}
      </ul>
    </div>
  );
}
SSR + SSG
Yes, some frameworks let you combine both approaches within a single project for more flexibility. As you might guess, it all comes down to how you write the component.
Incremental Static Rendering (ISR)
Sometimes you need to refresh data more often than usual, but SSR still feels like overkill. For cases like this, Next supports ISR on top of SSG via the revalidate parameter:
export async function getStaticProps() {
  const res = await fetch('https://abaunda.org/posts');
  const posts = await res.json();

  return {
    props: {
      posts,
    },
    revalidate: 10, // Regenerate page every 10 seconds
  };
}

export default function Blog({ posts }) {
  return (
    <div>
      <h1>Blog</h1>
      <ul>
        {posts.map((post) => (
          <li key={post.id}>{post.title}</li>
        ))}
      </ul>
    </div>
  );
}
And now that one specific page will get rebuilt every 10 seconds in the background.
Dynamic meta tags
So, now that content isn’t a problem anymore, it’s time to deal with an equally serious issue — meta tags. They need to be unique for every page, so we need a way to update them.
Since we’re working with React, we’ll look at solutions specific to it, though the underlying principles are similar across most frameworks.
Before React 19
Classic frontend development: if you need to do something, there’s a library for that :)
In our case, React Helmet fits the bill — it gives you a component of the same name that you can use in your pages to manage meta tags dynamically. Example code:
import { Helmet } from 'react-helmet';

export default function Post({ post }) {
  return (
    <div>
      <Helmet>
        <title>{post.title}</title>
        <meta name="description" content={post.description} />
        <meta property="og:title" content={post.title} />
        <meta property="og:description" content={post.description} />
        <meta property="og:image" content={post.image} />
      </Helmet>
      <h1>{post.title}</h1>
      <p>{post.content}</p>
    </div>
  );
}
And that’s really it. A very simple, time-tested approach.
If you’re using SSR, it’s recommended to use the updated fork, react-helmet-async. Just note you’ll need to additionally wrap your component in a special provider.
React 19
The latest React release added built-in support for dynamic meta tags. We can rewrite the code above like this:
export default function Post({ post }) {
  return (
    <div>
      <title>{post.title}</title>
      <meta name="description" content={post.description} />
      <meta property="og:title" content={post.title} />
      <meta property="og:description" content={post.description} />
      <meta property="og:image" content={post.image} />
      <h1>{post.title}</h1>
      <p>{post.content}</p>
    </div>
  );
}
You might get the impression this makes the component “messier” — after all, we were taught not to mix meta tags in with regular ones. If that bothers you, you can wrap them in a fragment, or just go old-school with Helmet.
| Important! If you use the second approach, make absolutely sure you have React 19 or later installed. Otherwise, the meta tags will end up inside your root component instead of bubbling up into <head>. That means crawlers simply won’t read them.
Next.js (the preferred way)
If you want to improve your SEO, you’re using SSR/SSG one way or another anyway — which in most cases means Next.js too.
It ships with a special <Head> component, functionally identical to <Helmet>, but with no extra installation needed, and it’s generally the more native, more appropriate solution.
Usage example:
import Head from 'next/head';

export default function Post({ post }) {
  return (
    <div>
      <Head>
        <title>{post.title}</title>
        <meta name="description" content={post.description} />
        <meta property="og:title" content={post.title} />
        <meta property="og:description" content={post.description} />
        <meta property="og:image" content={post.image} />
      </Head>
      <h1>{post.title}</h1>
      <p>{post.content}</p>
    </div>
  );
}
Anything else?
We’ve covered the main ways to optimize SPA SEO, specifically the SPA-specific bits.
Let’s quickly run through the other, more familiar SEO techniques too. We won’t go into as much depth here, since there’s practically no difference (architectural details aside, of course).
robots.txt
The robots.txt file tells crawlers which pages they can and can’t scan. It’s a handy way to hide an admin panel, or pages that are still under construction.
It typically looks like this:
User-agent: *
Allow: /
Disallow: /admin
Sitemap: https://abaunda.org/sitemap.xml
The first line specifies which crawlers the rules apply to (all of them, in our case), then Allow and Disallow mark which paths on our domain can and can’t be crawled. The last line points to the sitemap.
This file then needs to go in public/ or static/ — that’s what makes it directly accessible at https://abaunda.org/robots.txt. Done!
sitemap.xml
The sitemap.xml file lists every page on the site that should be indexed by search engines.
Specifically for React (or more precisely, Next), there’s a library called next-sitemap that generates sitemap.xml for you. You can, of course, write the map by hand, but that gets tedious fast. It’s easier to just edit a generated one.
After installing it, in the next-sitemap.config.js config file, we write:
module.exports = {
  siteUrl: 'https://abaunda.org',
  // generateRobotsTxt: true,
  // the library can also generate robots.txt
};
Then, in the scripts section of package.json, we add:
"scripts": {
  "postbuild": "next-sitemap"
}
After building the project, you’ll get a sitemap.xml.
Semantic markup and aria accessibility attributes
Never forget about these either!